Create Engaging Content with Storybooks
WHAT IS IT? Storybooks give you the ability to mix different content types so you can create compelling and engaging content for your consumers.
You can add the following content to your storybook:
- Static content: Content that does not change. For example, a product added to the storybook will always appear in the same slot each time the storybook loads.
- Dynamic content: Content that changes each time the storybook appears. Since the content is based on the data compiled by the Upscale Intelligence service, the consumer could end up seeing new content each time this storybook loads.
- Customize media: An image or video that displays in place of the real content or doesn’t link any content. For example, you’ve added a dress as one of the contents in your storybook. Instead of displaying the image of a dress, you could replace it with a video of a woman modeling the dress.
Once you create a storybook with your chosen content, you can configure the layout and use triggers to determine when this storybook displays in your application. When you have multiple storybooks created, these triggers allow you to strategize which storybook to display on a given page.
Let’s take a look at how your storybook can evolve.
Basic Storybook
You can group different types of content within a storybook to convey a message to your consumers. For example, you’re creating a storybook with content for “Preparing for an evening out” and you want to showcase your new products.
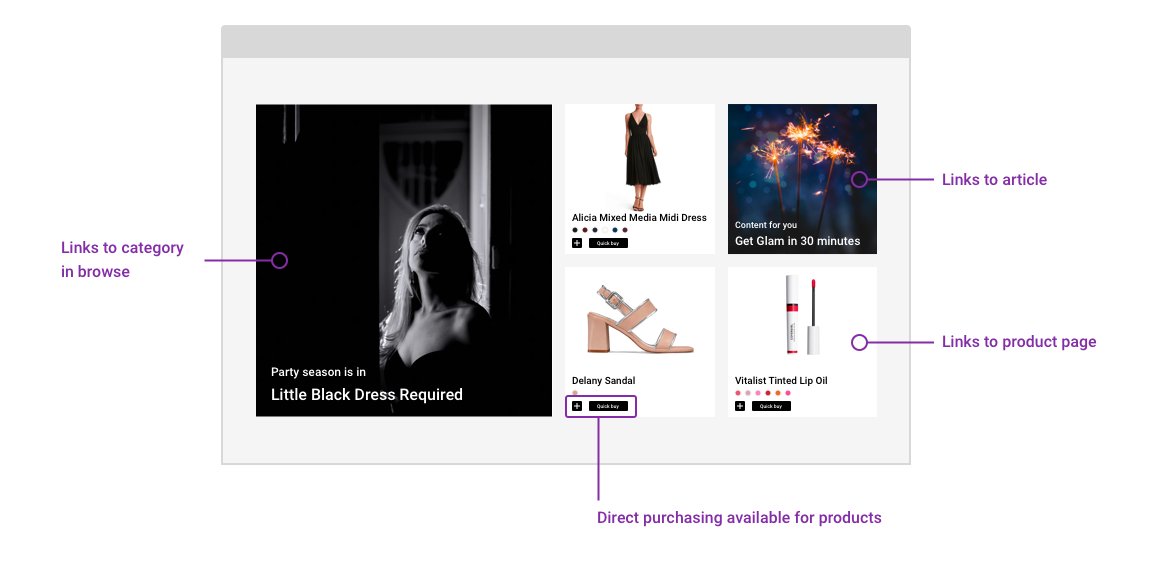
Here, the dress, heels, and lipstick are content that link to their corresponding product in your selling tree. The Little Black Dress Required image links to the New Arrivals, Dresses category in the browse template and the article links to one of your published blog posts.
This storybook will look exactly the same each time it loads in your application. So how can you personalize it to each of your consumers? Try adding in some dynamic content.
Dynamic Storybook
Instead of seeing the same content each time this storybook displays, what if the content could change as the consumer shops?
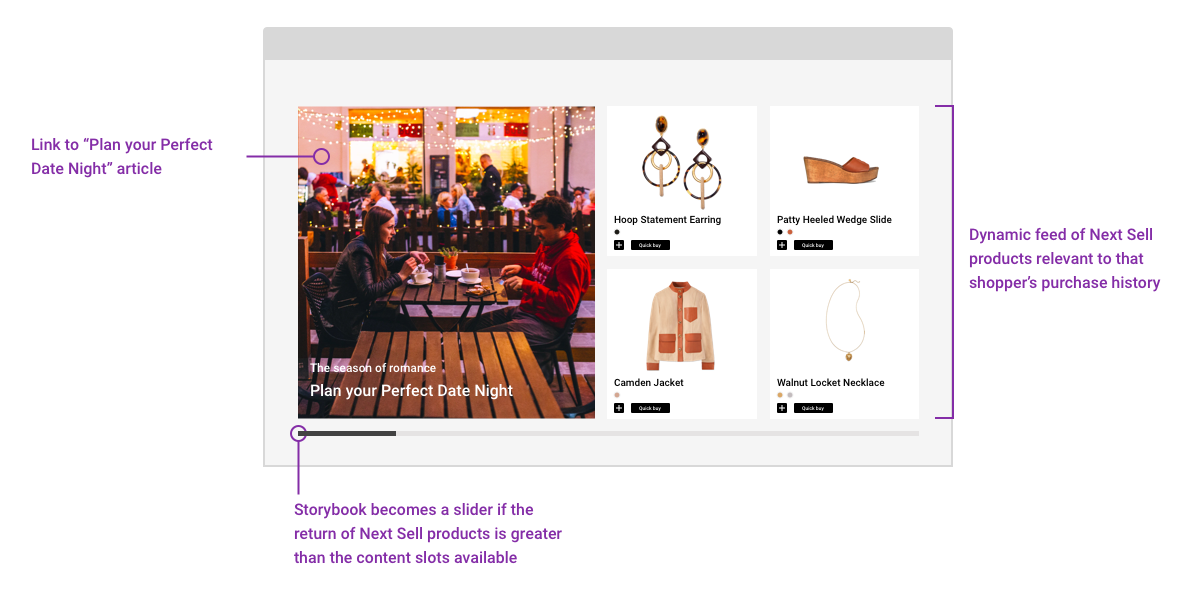
In this example, the Next Sell feature is added to the static article content. Next Sell will suggest some products to the consumer since they have already made a purchase. These products are determined by the data that’s compiled by the Intelligence service. This list of Next Sell products also changes each time this storybook appears.
Want to take this storybook to the next level? Let’s incorporate more engaging content.
Engaging Storybook
Now that you’ve seen a storybook with static and dynamic content, let’s see how you can elevate the look and feel of it by substituting the images for an alternate image or maybe even a video.
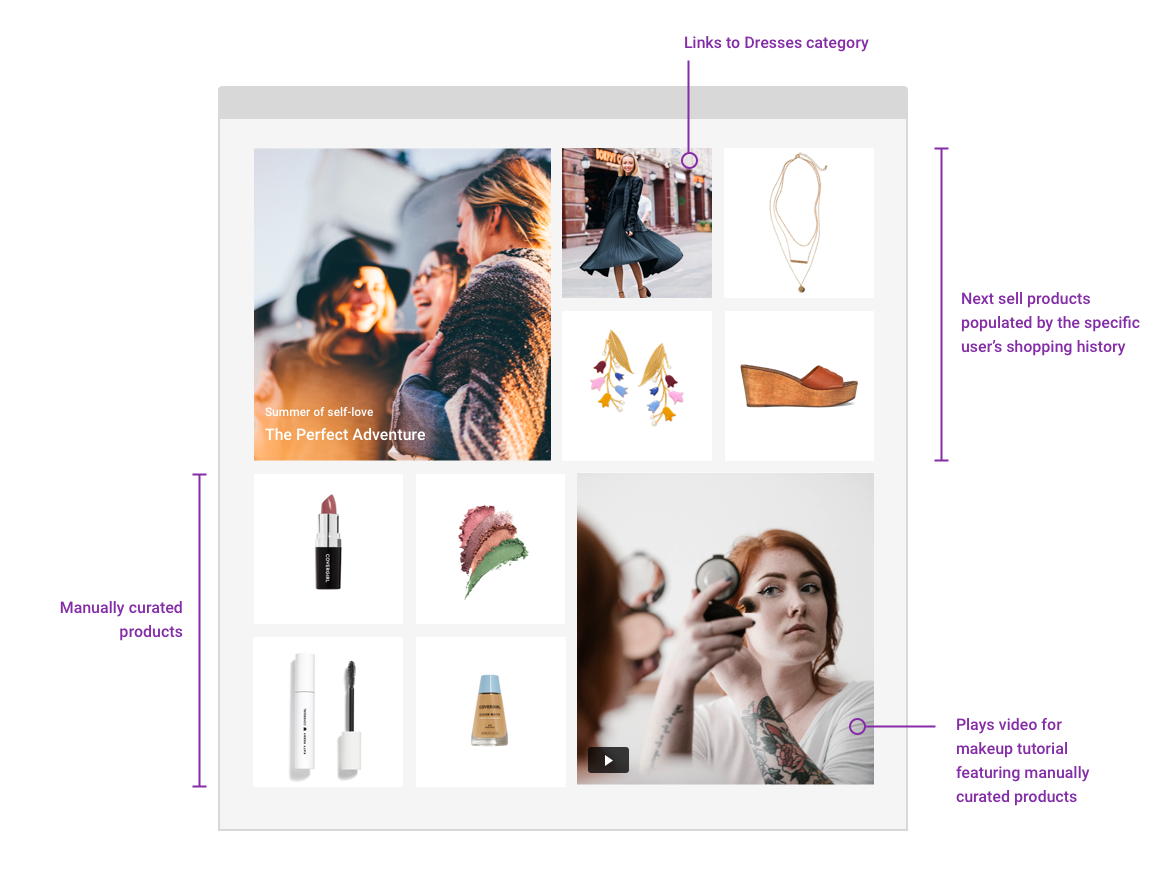
In this example, The Perfect Adventure image does not link to any content. The content beside it links to the Dresses category (static content) and the Next Sell products (dynamic content).
The makeup products are also static and link directly to its corresponding product. But this list of products are strategically placed since they’re the ones used in the makeup tutorial video that’s playing beside it. Something else you can do is to remove the static products from the storybook and link the video to the makeup collection you created that has all of the products the model is using.
Storybook Layouts
Once you’ve selected the content for your storybook, think about how it should look when you configure the layout.
The following are the layout styles you’ll need to configure:
- Asymmetrical vs Grid
- Stacked vs Slide
- Cover vs Contain
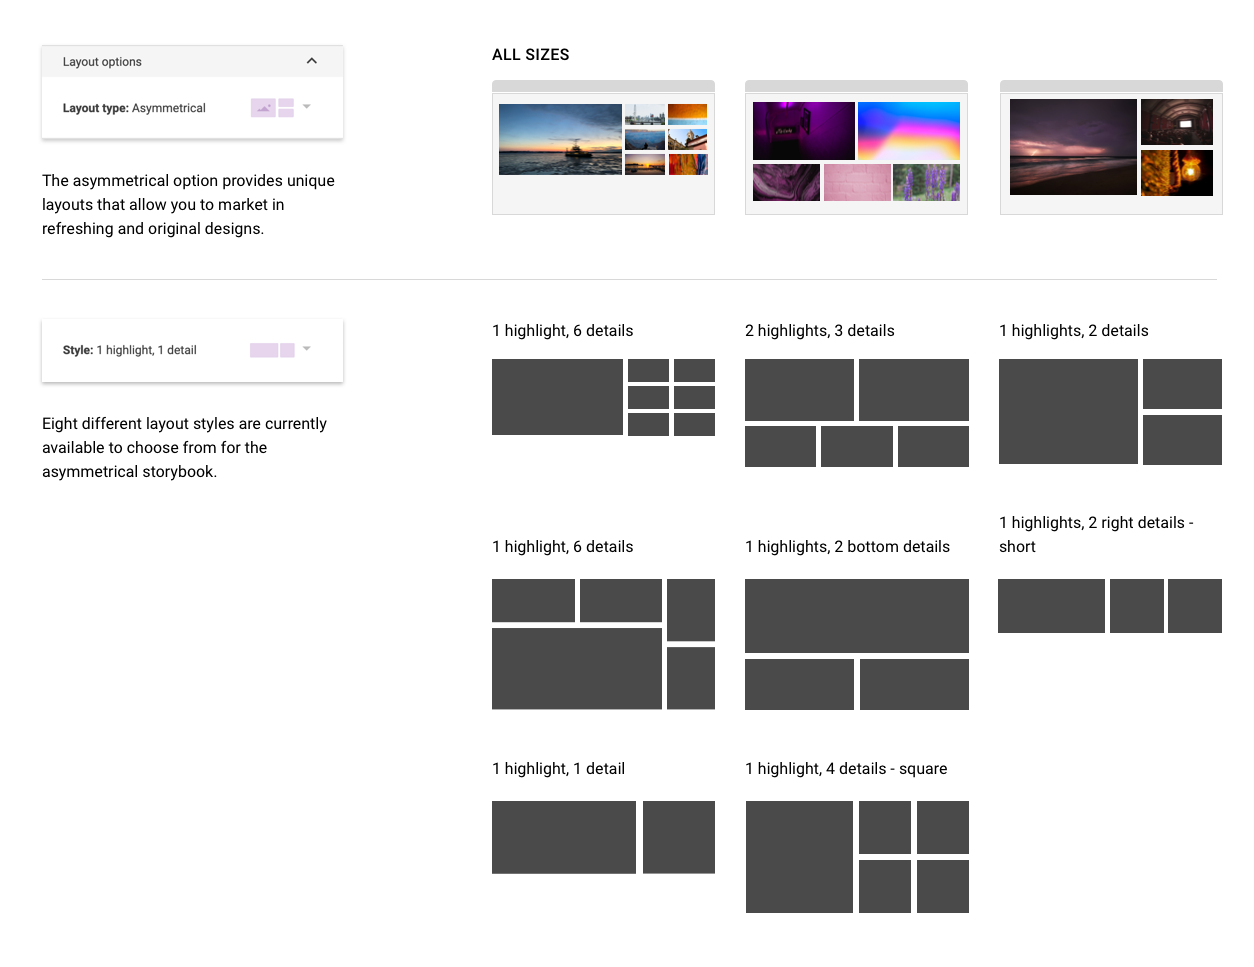
Asymmetrical vs Grid
Asymmetrical - Consists of content that varies in size depending on the number of highlights (large content) and details (small content) you select and how they are organized on the screen.
If the number of content in your storybook exceeds the asymmetrical layout you selected, the pattern is repeated based on the stagger type you select. You can flip the storybook vertically, horizontally, or choose to not flip it at all. See the image in the Engaging Storybook section for an example of an asymmetrical, stacked, horizontal flip.
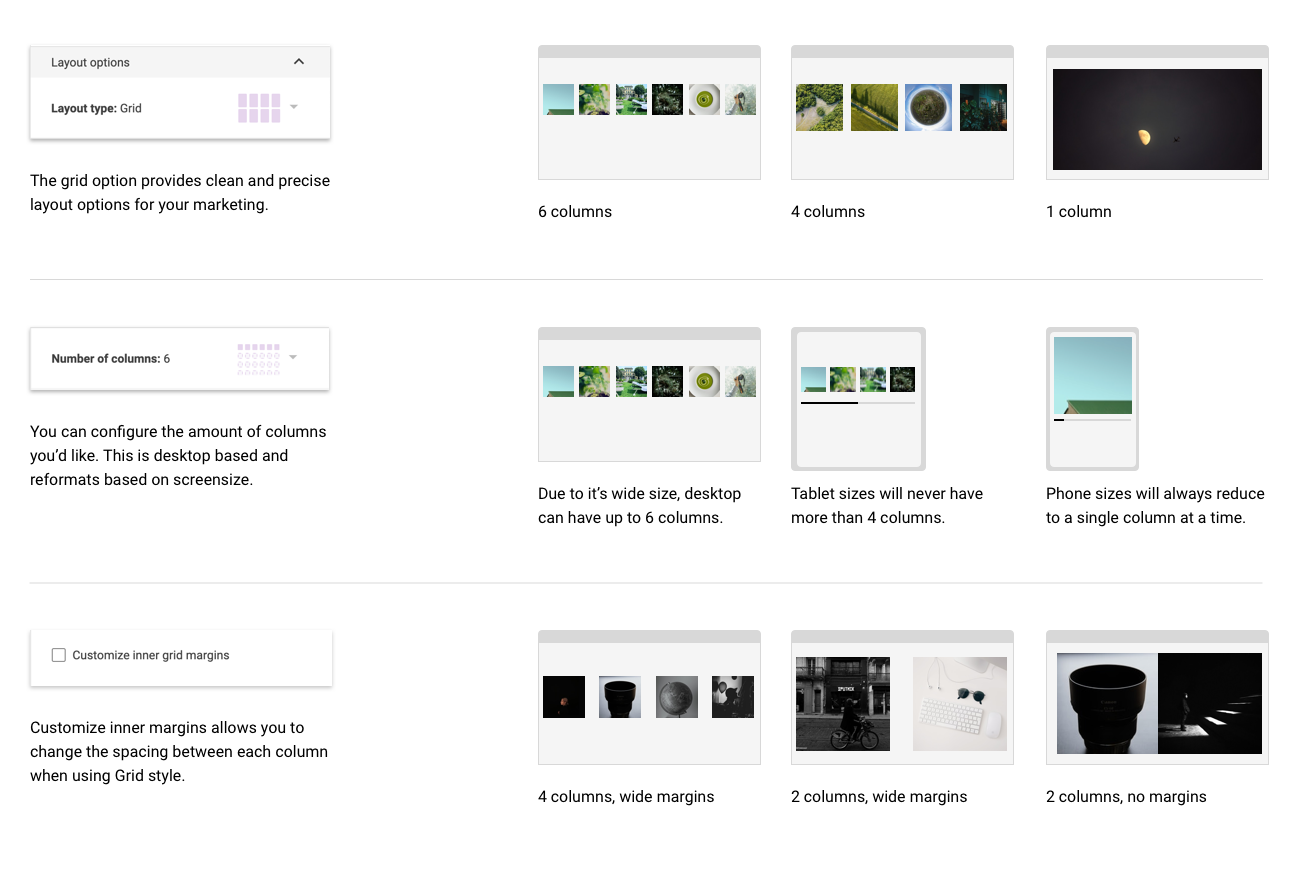
Grid - Consists of content that are all the same size and are arranged in the number of columns (1-6) of your choice.
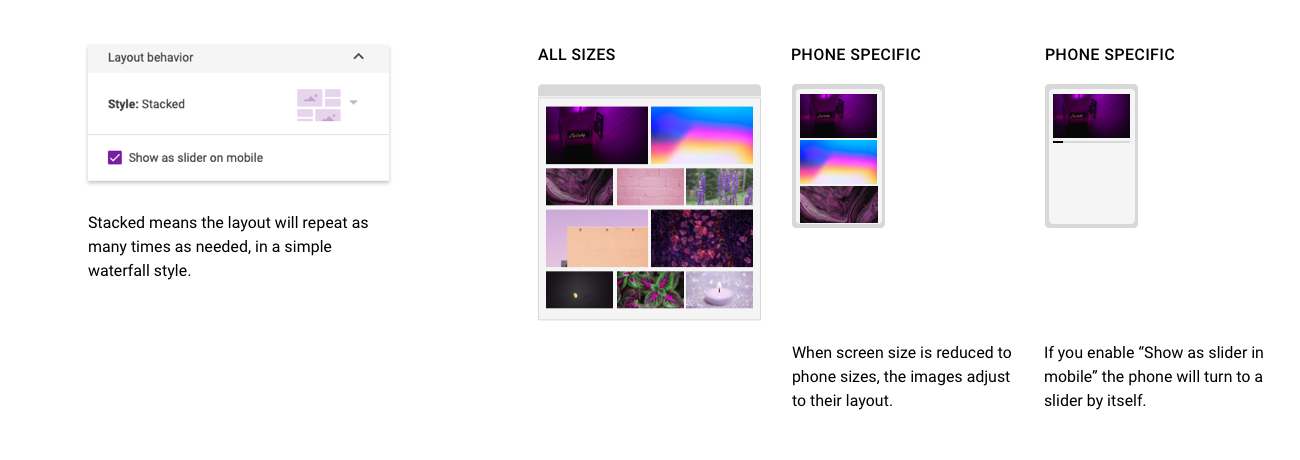
Stacked vs Slide
Now that you’ve selected either asymmetrical or grid as your layout, choose how you want the content to be displayed.
Stacked - Your selected layout is repeated one on top of the other.
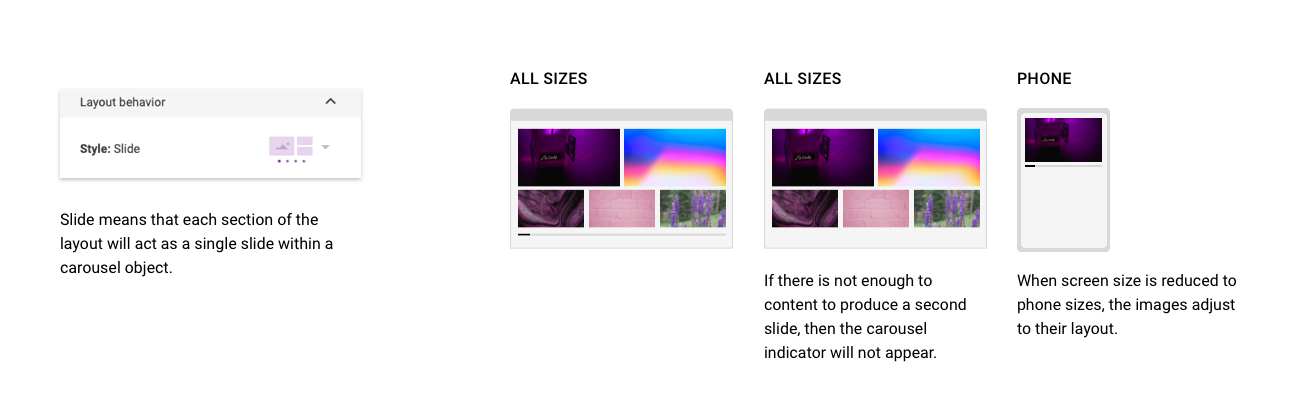
Slide - Your selected layout is repeated one beside the other, creating a carousel of content.
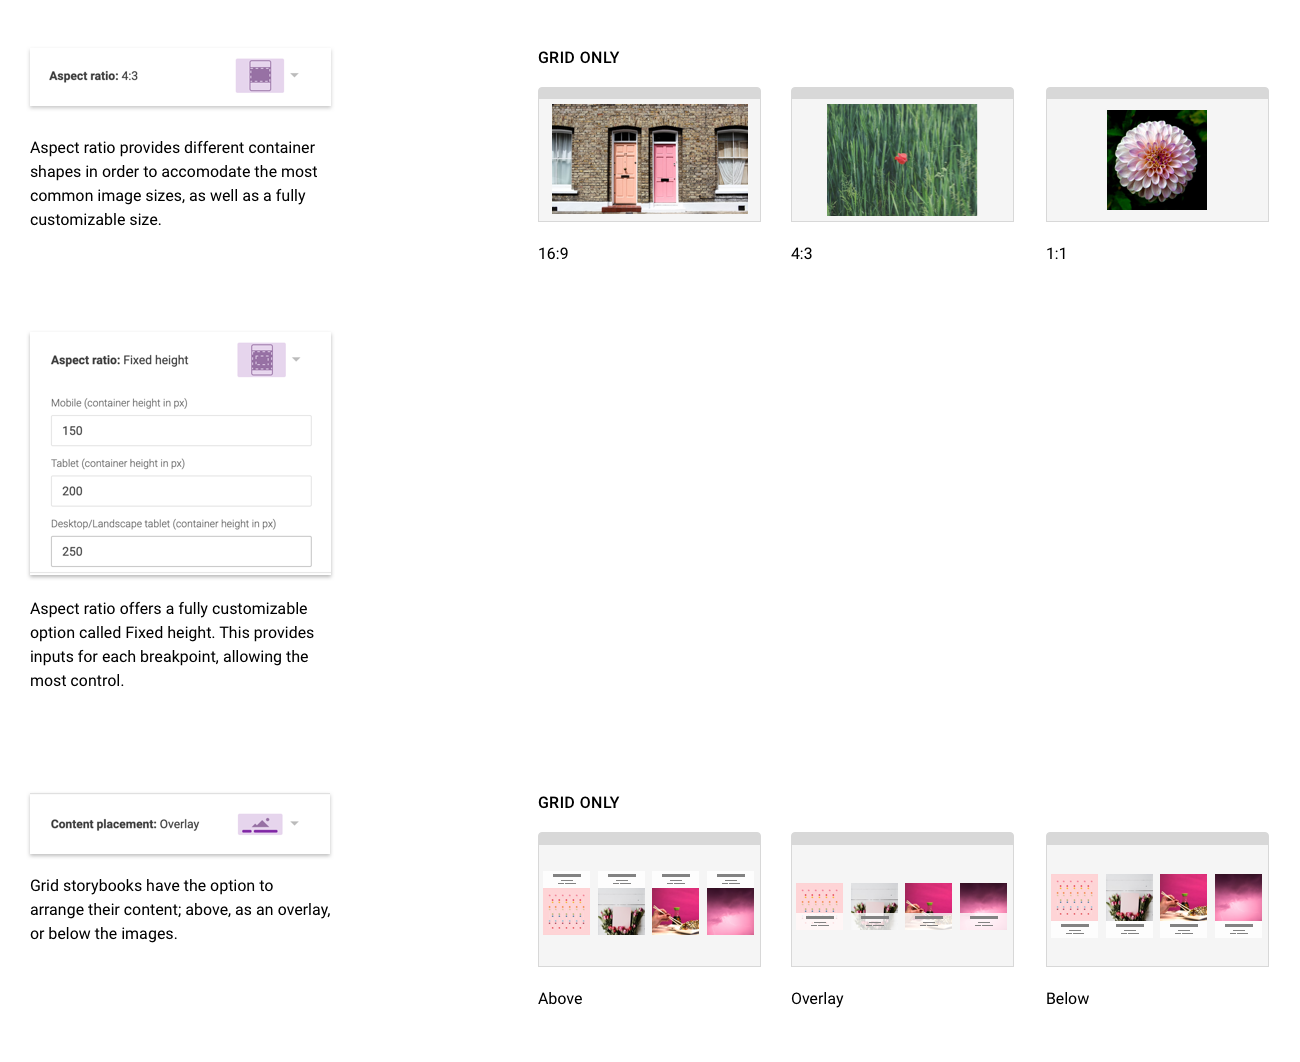
Cover vs Contain
This refers to how the content image is displayed in the storybook.
Cover - The image extends beyond the content’s border, which means there’s no white space between the images.

Contain - The image stays within the content border of the layout you selected.
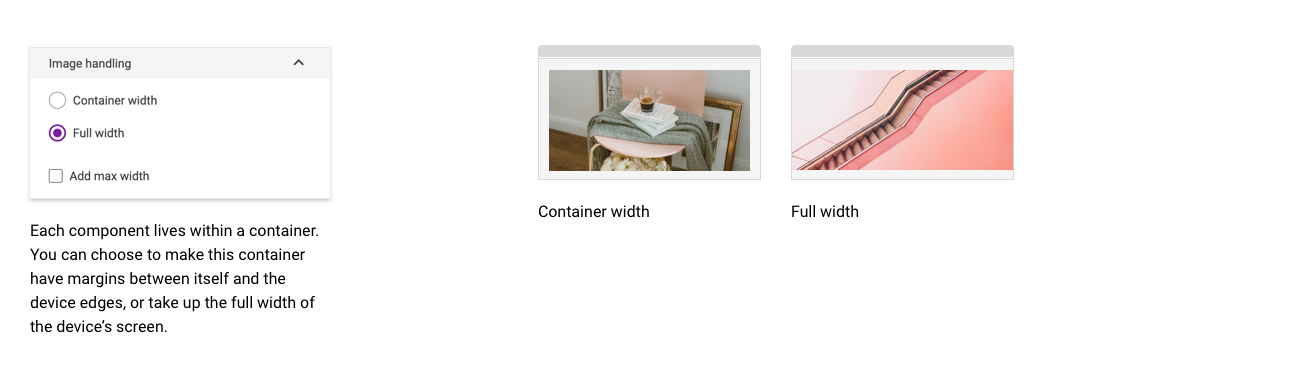
Image handling
Merchandising Triggers
When you create multiple storybooks for a given template, how do you determine which one is displayed? With triggers, you can ensure that as the consumer clicks through the application, selecting certain content will display certain storybooks.
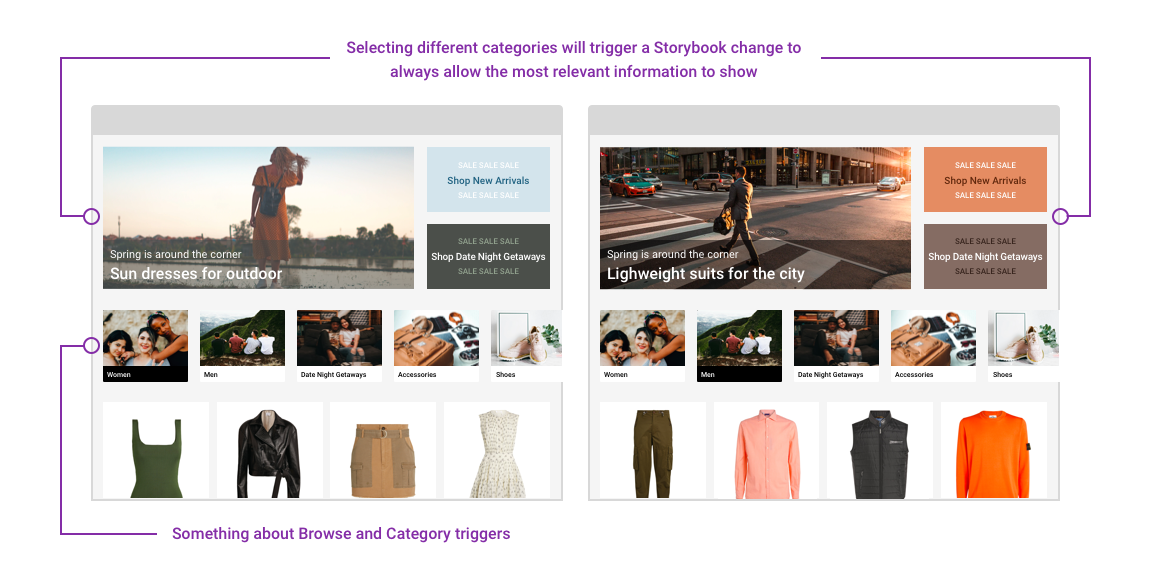
In this example you can see that by selecting the Women or Men category in the browse template will trigger the corresponding storybook.
How do I do it?
Goal: To create a storybook with different types of content that gets triggered on specific templates when certain contents are clicked on.
To properly set up your storybook, you need to complete the following:
- Create a storybook and add your content to it.
- Add the storybook component to the template and configure the layout.
- Assign the storybook to its corresponding component for a given experience.
- Configure the storybook triggers.
- Publish the storybook.
Create a New Storybook
Complete these steps to create a new storybook and add content to it.
- In the Workbench, click the Editions menu and select Storybooks.
- Click the + Storybook button and the storybook configuration page appears.
- There are two ways that you can add content to the storybook:
- In the Storybook content window, click Content + to add your static content. Fill in the values for the storybook content item. You can add one of the following contents to your storybook:
- Article
- Category
- Product
- Default template
- Template ID
- Image/Video or text
- In the Storybook content window, click Source + to add your dynamic content. Fill in the values for the storybook content item. You can add one of the following dynamic contents to your storybook:
- Category
- Next sell
- Tailored Categories
- To use an alternate image or video for your content, select Custom image or Custom video in the Image selection and provide the corresponding URL.
- Click Save.
The new content is added to the list in the Storybook content window and the content’s image appears in the Storybook images window.
TIP: The content appears in the order they are added. You can click and drag the items in the Storybook content window to reorder the content.
Configure the Storybook Component
Note: This procedure assumes that you already have an experience created and your templates set up.
Complete these steps to configure the look and feel of your storybook.
- Click the Experiences menu and select the experience where you want to add the new storybook component. The experience should now be in edit mode.
- Select the template and click Component + to add the Storybook component. You can click and drag where you want this new component to appear.
- In the Storybook settings panel, you need to define the following:
- Display: What is to be displayed regarding each of the different content you can add to the storybook.
- Layout: How the text and images are arranged.
- Behavior: How the video content behaves and what happens when the consumer clicks a product or a button.
- Click Save to set your component configurations.
Assign to an Experience’s Storybook Component
Complete these steps to assign the storybook to an active experience’s component. This ensures the storybook appears in your application.
- Click the Editions menu and select Storybooks from the Object dropdown.
- Select the storybook you want to assign.
- In the Assignment panel, click Edit assignments. The Assign Storybook window appears.
- From the list of experiences, select the component(s) where you want the storybook to appear and click Continue.
- Click Save.
The storybook is now assigned to the selected component for a given experience.
Set the Merchandising Triggers
Complete these steps to determine which content will act as a trigger to ensure a specific storybook displays in the application. Triggers are optional and do not need to be set if you do not want your storybook to change as your consumers click through a specific template.
- Click the Editions menu and select Storybooks from the Object dropdown.
- Select the storybook you want to assign.
- In the Merchandising assignments panel, click Edit merchandising. The Assign merchandising triggers to storybook window appears.
- Select which articles, categories, and/or products you want as triggers for this specific storybook and click Assign.
A list of the content triggers now appears in the Merchandising assignments panel that indicate the triggers are set properly.
Publish the Storybook
For the storybook to appear in your application, you need to make sure it is published.
- Click the Editions menu and select Storybooks from the Object dropdown.
- Select the storybook you want to publish.
- Click the Draft dropdown and select Publish.